1. 동적바인딩(지역 변수)과 정적바인딩(static변수)
#include <iostream>
using std::cout;
void sub();
int main()
{
	cout << "start\n";
	sub();
	sub();
	sub();
	return 0;
}
void sub()
{
	int x = 10;
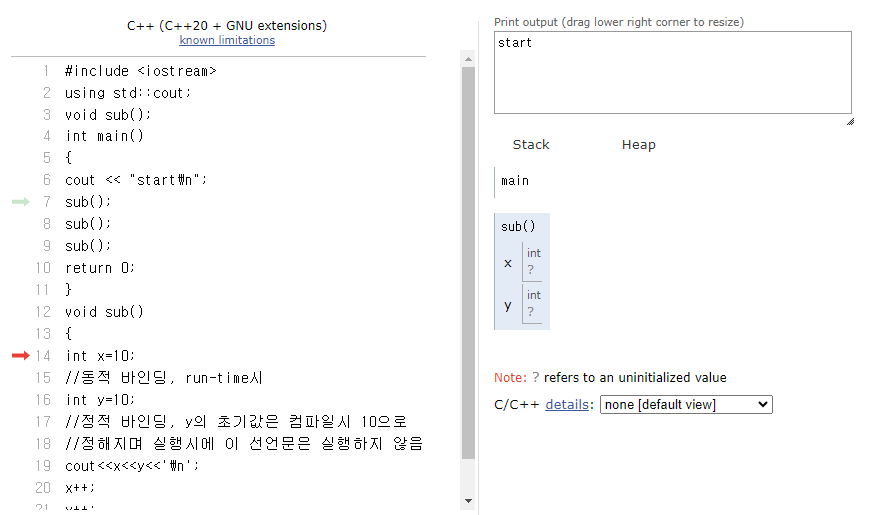
	//동적 바인딩, run-time시
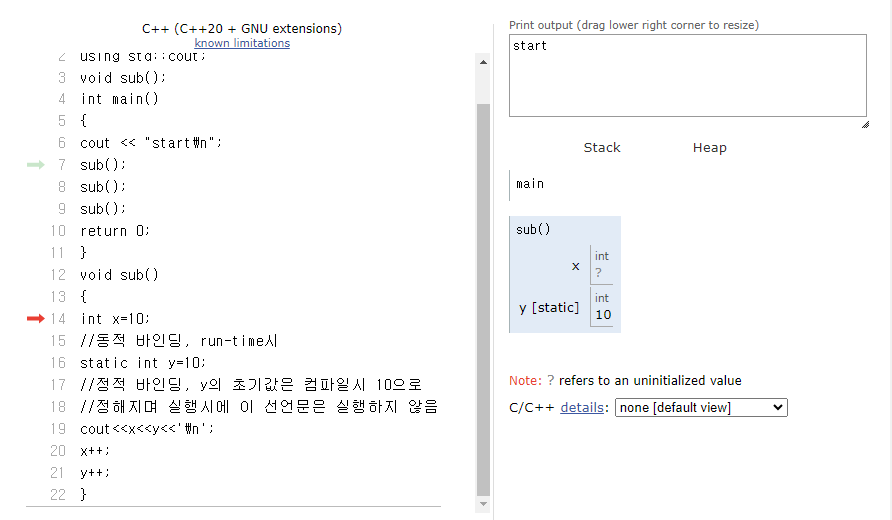
	static int y = 10;
	//정적 바인딩, y의 초기값은 컴파일시 10으로
	//정해지며 실행시에 이 선언문은 실행하지 않음
	cout << x << y << '\n';
	x++;
	y++;
}
16번째 줄 static 삭제한 소스

16번째 줄 static 있는 소스

static 키워드는 함수 내 변수를 정적 지역 변수로 만듭니다. 이 변수는 한 번 초기화되고, 프로그램 실행 동안 계속 메모리에 남아 있습니다. 함수 내에서만 접근 가능하며, 값이 계속 유지됩니다.
2. 바인딩(binding)

3. 정적(static) 멤버변수
#include <iostream>
using std::cout;
class Point {
	int x;
	int y;
	static int count; //선언
public:
	Point() { cout << ++count; }
	~Point() { cout << --count; }
};
int Point::count = 0; //정의
int main()
{
	Point p1, p2, p3;
	return 0;
}
선언만하면 기억 장소를 할당하는 것이 아니기 때문에 클래스 밖에서 정의해야 한다.

4. static 키워드 사용법을 프로그래밍 언어별로 설명
1. C++
- static 변수: 함수 내부나 클래스 내부에서 선언된 static 변수는 프로그램의 수명 동안 계속 존재하며, 초기화는 한 번만 이루어집니다.
- static 함수: 해당 파일 내에서만 접근이 가능하며, 다른 파일에서는 접근할 수 없습니다.
- static 클래스 멤버: 클래스의 static 멤버 변수는 해당 클래스의 모든 객체에 대해 공유됩니다. static 멤버 함수는 객체를 생성하지 않고도 호출할 수 있습니다.
class Example {
public:
    static int count;
    static void incrementCount() {
        count++;
    }
};
int Example::count = 0;
2. Java
- static 변수: 클래스의 모든 인스턴스가 공유하는 변수입니다. 객체를 생성하지 않고도 접근할 수 있습니다.
- static 메소드: 객체를 생성하지 않고도 호출할 수 있는 메소드입니다.
- static 클래스: 클래스 내부에 정의된 중첩 클래스입니다. 객체를 생성하지 않고도 접근할 수 있습니다.
public class Example {
    public static int count;
    public static void incrementCount() {
        count++;
    }
}
3. C#
- static 변수: 클래스의 모든 인스턴스가 공유하는 변수입니다. 객체를 생성하지 않고도 접근할 수 있습니다.
- static 메소드: 객체를 생성하지 않고도 호출할 수 있는 메소드입니다.
- static 클래스: 인스턴스를 생성할 수 없는 클래스입니다. 모든 멤버가 static이어야 합니다.
public class Example {
    public static int count;
    public static void incrementCount() {
        count++;
    }
}
5. Generic programming
타입을 실행할 때 결정하는 것
6. 함수 중첩을 Template로 바꾸기
//함수 중첩
#include <iostream>
using std::cout;
using std::endl;
int Max(int i, int j)
{
	return i > j ? i : j;
}
double Max(double i, double j)
{
	return i > j ? i : j;
}
char Max(char i, char j)
{
	return i > j ? i : j;
}
int main()
{
	cout << "Max값은=" << Max(1, 2) << endl;
	cout << "Max값은=" << Max(7.5, 3.6) << endl;
	cout << "Max값은=" << Max('A', 'B');
	return 0;
}

//Template
#include <iostream>
using std::cout;
using std::endl;
template <typename T> T Max(T i, T j) //template <class T> T Max(T i, T j)와 같음
{
	return i > j ? i : j;
}

int main()
{
	cout << "Max값은=" << Max(1, 2) << endl;
	cout << "Max값은=" << Max(7.5, 3.6) << endl;
	cout << "Max값은=" << Max('A', 'B');
	return 0;
}
7. 템플릿의 구현
#include <iostream>
using std::cout;
using std::endl;
template <typename T1, typename T2> void fun(T1 x, T2 y)
{ // 두 개의 매개변수 자료형이 T1과 T2로 다르다.
	cout << x << " " << y << endl;
}
int main()
{
	fun("Han", 30); // T1은 문자열(const char *),T2는 정수형(int)
	fun(25, 50.5); // T1은 정수형(int), T2는 double형
	return 0;
}
8. 템플릿을 이용하여 일반화된 클래스 구현
#include <iostream>
using std::cout;
using std::endl;
class CCC1
{
	int x;
	int y;
public:
	CCC1(int xx, int yy) { x = xx; y = yy; }
	void Print() { cout << x << ',' << y << endl; }
};
class CCC2
{
	double x;
	double y;
public:
	CCC2(double xx, double yy) { x = xx; y = yy; }
	void Print() { cout << x << ',' << y << endl; }
};
class CCC3
{
	char x;
	const char* y;
public:
	CCC3(char xx, const char* yy) { x = xx; y = yy; }
	void Print() { cout << x << ',' << y << endl; }
};
int main()
{
	CCC1 c1(10, 20);
	CCC2 c2(3.5, 5.5);
	CCC3 c3('I', "Love You!");
	c1.Print();
	c2.Print();
	c3.Print();
	return 0;
}

//1단계 수정
#include <iostream>
using std::cout;
using std::endl;
template <class T1, class T2>
class CCC1
{
	T1 x;
	T2 y;
public:
	CCC1(T1 xx, T2 yy) { x = xx; y = yy; }
	void Print() { cout << x << ',' << y << endl; }
};
int main()
{
	CCC1 c1(10, 20);
	CCC1 c2(3.5, 5.5);
	CCC1 c3('I', "Love You!");
	c1.Print();
	c2.Print();
	c3.Print();
	return 0;
}

//2단계 수정
#include <iostream>
using std::cout;
using std::endl;
template <class T1, class T2>
class CCC1
{
	T1 x;
	T2 y;
public:
	CCC1(T1 xx, T2 yy) { x = xx; y = yy; }
	void Print() { cout << x << ',' << y << endl; }
};
int main()
{
	CCC1<int, int> c1(10, 20);
	CCC1<double, double> c2(3.5, 5.5);
	CCC1<char,const char *> c3('I', "Love You!");
	c1.Print();
	c2.Print();
	c3.Print();
	return 0;
}
9. 객체지향언어에서 <> 사용법 설명
1. C++ : C++에서는 템플릿을 사용해 제네릭 프로그래밍을 합니다. 예를 들어, 다양한 타입의 두 값을 더하는 함수를 작성할 수 있습니다.
template <typename T>
T add(T a, T b) {
    return a + b;
}

int main() {
    cout << add<int>(1, 2) << endl; // int형
    cout << add<double>(1.2, 3.4) << endl; // double형
    return 0;
}
2. Java : 클래스나 메소드에서 사용할 데이터 타입을 인스턴스 생성시점이나 메소드 호출 시점에 결정할 수 있습니다. 예를 들어, 다양한 타입의 객체를 저장할 수 있는 Box 클래스를 작성할 수 있습니다.
public class Box<T> {
    private T t;

    public void set(T t) {
        this.t = t;
    }

    public T get() {
        return t;
    }

    public static void main(String[] args) {
        Box<Integer> integerBox = new Box<Integer>();
        integerBox.set(new Integer(10));
        Integer someInteger = integerBox.get();
        System.out.println(someInteger);

        Box<String> stringBox = new Box<String>();
        stringBox.set(new String("Hello World"));
        String someString = stringBox.get();
        System.out.println(someString);
    }
}
위의 예시에서 'T'는 타입 파라미터로, 실제 타입은 Box 객체를 생성할 때 결정됩니다. 따라서 Box 클래스는 다양한 타입의 객체를 저장할 수 있습니다. 이렇게 제네릭을 사용하면 코드의 재사용성이 높아지고 타입 체크가 가능해져서 안정성도 향상됩니다.
10. STL(Standard Template Library)

11. STL의 주요 구성 요소

12. vector 컨테이너
#include <iostream>
#include <vector>
using namespace std;
int main()
{
	vector <int> x; //int x[10]와 차이
	// 여러 개 int형을 가지고 노는 배열 공간을 만들고 싶어요
	x.push_back(12);
	x.push_back(1);
	x.push_back(2);
	for (int i = 0; i < x.size(); i++)
		cout << x[i] << endl;

	vector <double> x1; //int x[10]와 차이
	// 여러 개 int형을 가지고 노는 배열 공간을 만들고 싶어요
	x1.push_back(12.7);
	x1.push_back(1.5);
	x1.push_back(2.2);
	for (int i = 0; i < x1.size(); i++)
		cout << x1[i] << endl;
	return 0;
}
13. vector container, iterator, algorithm, functor
#include <iostream>
#include <vector> // vector container
#include <algorithm> // sort
#include <functional> // 함수자 less<>, greater<>
using namespace std;
int main()
{
	vector<int> v(5); //vector container
	cout << v.size() << " : " << v.capacity() << endl; //5 :5
	//capacity는 할당된 메모리 공간의 크기, size는 저장된 데이터 요소의 개수
	for (int i = 0; i < v.size(); i++) cout << v[i] << ' '; //0 0 0 0 0
	cout << endl;
	for (int i = 0; i < v.size(); i++) v[i] = i + 1;
	for (int i = 0; i < v.size(); i++) cout << v[i] << ' '; //1 2 3 4 5
	cout << endl;
	for (int i = 0; i < 5; i++) v.push_back(10 - i);
	vector<int>::iterator iter; //iterator
	for (iter = v.begin(); iter != v.end(); iter++)cout << *iter << ' ';
	// 1 2 3 4 5 10 9 8 7 6
	sort(v.begin(), v.end()); cout << endl; //algorithm
	for (iter = v.begin(); iter != v.end(); iter++)cout << *iter << ' ';
	// 1 2 3 4 5 6 7 8 9 10
	sort(v.begin(), v.end(), greater<int>()); //functor
	cout << endl;
	for (iter = v.begin(); iter != v.end(); iter++)cout << *iter << ' ';
	// 10 9 8 7 6 5 4 3 2 1
	return 0;
}
14. 예외처리(exception handling, error handling)

프로그램 실행 중 예외 발생(특별한 처리가 필요한 비정상적이거나 예외적인 조건)에 대응하는 프로세스.
15. 예외처리 관련 키워드

16. c#, c++, 자바에서 exception handling하는 방법
1. C# : try-catch-finally 블록을 사용하여 예외를 처리합니다.
try {
    // 예외가 발생할 가능성이 있는 코드
    int zero = 0;
    int result = 10 / zero;
} catch (DivideByZeroException e) {
    // 예외가 발생했을 때 실행할 코드
    Console.WriteLine("Cannot divide by zero");
} finally {
    // 예외 발생 여부와 관계 없이 항상 실행할 코드
    Console.WriteLine("Finally block executed");
}
2. C++ : try-catch 블록을 사용하여 예외를 처리합니다.
try {
    // 예외가 발생할 가능성이 있는 코드
    throw "This is an exception";
} catch (const char* e) {
    // 예외가 발생했을 때 실행할 코드
    cout << "Caught exception: " << e << endl;
}
3. Java : try-catch-finally 블록을 사용하여 예외를 처리합니다.
try {
    // 예외가 발생할 가능성이 있는 코드
    int[] arr = new int[5];
    System.out.println(arr[10]);
} catch (ArrayIndexOutOfBoundsException e) {
    // 예외가 발생했을 때 실행할 코드
    System.out.println("Array index out of bound");
} finally {
    // 예외 발생 여부와 관계 없이 항상 실행할 코드
    System.out.println("Finally block executed");
}
17. 예외처리 예
//수정 전
#include <iostream>
using std::cout;
using std::cin;
using std::endl;
void Div(double ja, double mo)
{
	cout << "결과:" << ja / mo << endl;
}
int main()
{
	double x, y;
	cout << "분자를 입력하세요=";
	cin >> x;
	cout << "분모를 입력하세요=";
	cin >> y;
	Div(x, y);
	return 0;
}

//수정 후
#include <iostream>
using std::cout;
using std::cin;
using std::endl;
void Div(double ja, double mo)
{
	try { //1단계 예외가 발생할 수 있는 소스를 try 블록으로 묶는다.
		if (mo==0) throw mo; //2단계 예외가 발생할 수 있는 변수를 던진다.
        cout << "결과:" << ja / mo << endl;
	}
    catch(double) { //3단계 catch블록 다음 자료형은 분모의 자료형을 써야한다.
		cout << "오류:영으로 나눌 수 없음";
	}
}
int main()
{
	double x, y;
	cout << "분자를 입력하세요=";
	cin >> x;
	cout << "분모를 입력하세요=";
	cin >> y;
	Div(x, y);
	return 0;
}
C++ 강의 자료 참고했습니다.
'C++' 카테고리의 다른 글
| [C++ 프로그래밍] 15주차 콘솔/파일 입출력 (0) | 2023.12.14 |
|---|---|
| [C++ 프로그래밍] 13주차 overriding : 가상함수(virtual function)static (2) | 2023.11.30 |
| [C++ 프로그래밍] 12주차 상속(inheritance) (2) | 2023.11.23 |
| [C++ 프로그래밍] 11주차 함수중첩, 디폴트 인자 (0) | 2023.11.16 |
| [C++ 프로그래밍] 10주차 const동적 메모리 할당(new, delete) (6) | 2023.11.09 |
| [C++ 프로그래밍] 9주차 객체와 멤버 생성자 소멸자 this (0) | 2023.11.02 |
| [C++ 프로그래밍] 7주차 멤버의 접근 속성클래스와 객체 만들기 (2) | 2023.10.19 |
| [C++ 프로그래밍] 6주차 객체지향언어특징 클래스와객체 접근속성 (0) | 2023.10.12 |


